MatterSphere is great at reducing the amount of steps you have to take to perform certain tasks and also utilise existing information without having to reproduce it.
In this example we will create a letter template that when produced will recall already entered appointment details or prompt you to generate an appointment and then insert the relevant information into the created letter.
Create a Precedent
This step assumes you have both the correct permissions to create precedents and also some knowledge of simple precedent production.
- Create the content for your letter in the usual way
Insert Appointment Merge Field
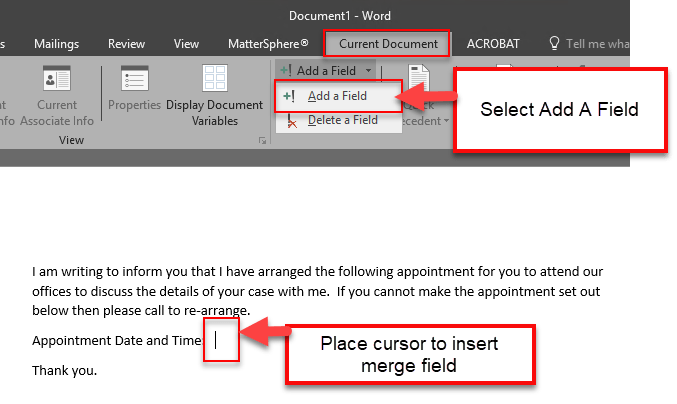
- Place the cursor in the position you wish the field to be inserted
- Select Current Document Tab
- Click Add a Field
- Select the Appointment Tab
- Select your required fields from the list
- Click Add to add each field where required.
View Merge Field Codes
To view that the fields have been inserted correctly within your document use the keyboard shortcut Alt + F9 this will display all field codes within this precedent.
Save Precedent
Once the document has been laid out and all required fields added you must save as a New Precedent.
- Ensure your merge codes are not visible by select Alt + F9 again
- Click Save as a New Precedent from the Current Document Tab
- Complete the wizard in the usual way with a clear Title and Description
- Ensure you select Letterhead to produce the letter in line with the default letterhead.
- Tick the Text only box as usually.
- Complete all other details as necessary.
- Click Finish when done.
Create Letter
This is now for any user to create and they will be prompted for the appointment details.
- In MS Word select the MatterSphere tab
- Click on Precedent Manager
- Search for the required precedent letter
- Click Continue when selected
- Choose the Client & Matter and relevant Associate in the normal way.
As the letter loads you will see a Matter Appointment Listing
Existing Appointment
- Check the Active appointment list
- Use Filters to narrow down results.
- Alternatively, you can type some text into Quick Search for faster results
- Click to highlight the correct appointment
- Click Select
New Appointment
You can create the appointment as part of the letter creation.
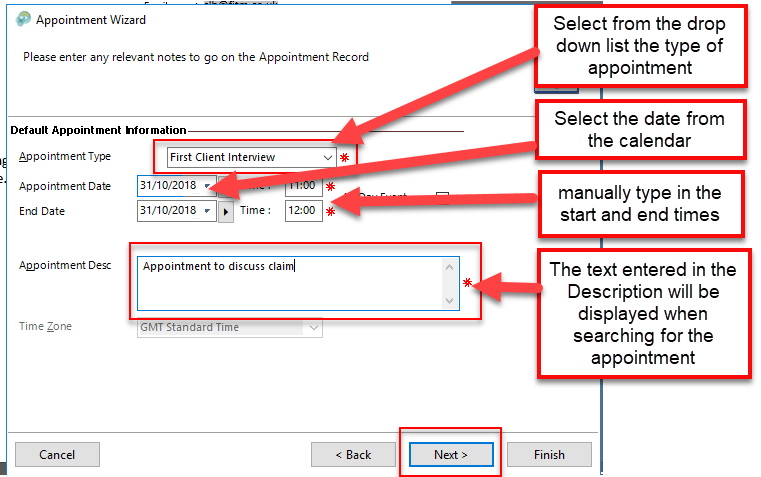
- Click on Add
- Complete all the necessary details
- Click Next to move to next screen
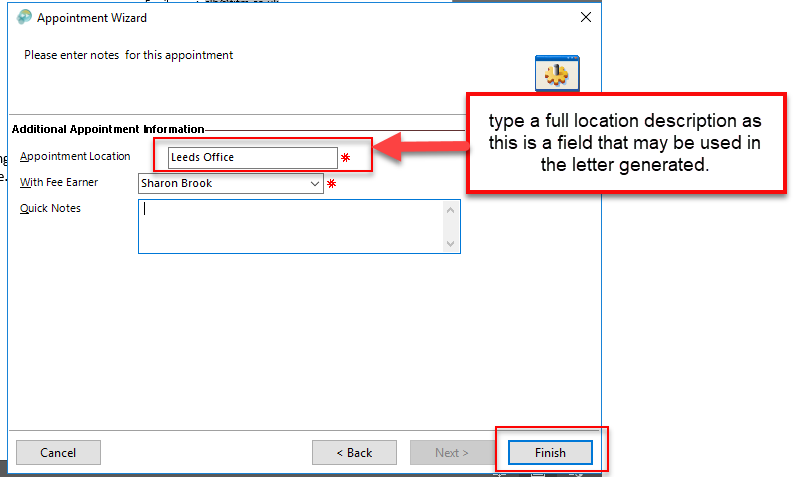
- Enter a complete location address/description
- Select the Fee Earner who will be hosting the appointment
- Finally click Finish
Once the appointment is added to the matter you will now be able to see it in the Matter Appointment Listing
- Click Select to enter the appointment details into the letter
Save Letter
You will now see that the appointment details have now been inserted into the letter.
- Save letter in usual way and send.
If you require any further information or training in Precedents or other aspects of MatterSphere please contact us at Fusion and we will be happy to assist.


